How to Create a Theme App Extension
In this guide, we will walk you through the process of building a theme app extension that can be added to any existing theme on the platform.
What You'll learn
After you've finished this tutorial, you’ll be able to:
- Build a theme extension app for YouCan platform
- Set up a development environment using YouCan CLI
- Create an app extension that integrates with existing themes
- Publish your theme app extension on the YouCan platform
Requirements
To start creating a theme app extension, you need to set up your working environment first.
- Create a YouCan Partner Account and set a development store.
- Ensure Required Software: You must have NodeJs, a package manager (either npm or pnpm), and git installed.
- Familiarity with HTML, CSS, and Liquid
- Select a Code Editor for managing the codebase.
Getting Started
Set Up YouCan CLI
To get started, you need to install youcan-cli as a global package on your computer.
npm install -g @youcan/cli@latest @youcan/app@latestTo make sure the installation was successful, run the following command to verify the installation and display the available commands.
youcan --helpAccess Your Dev Store
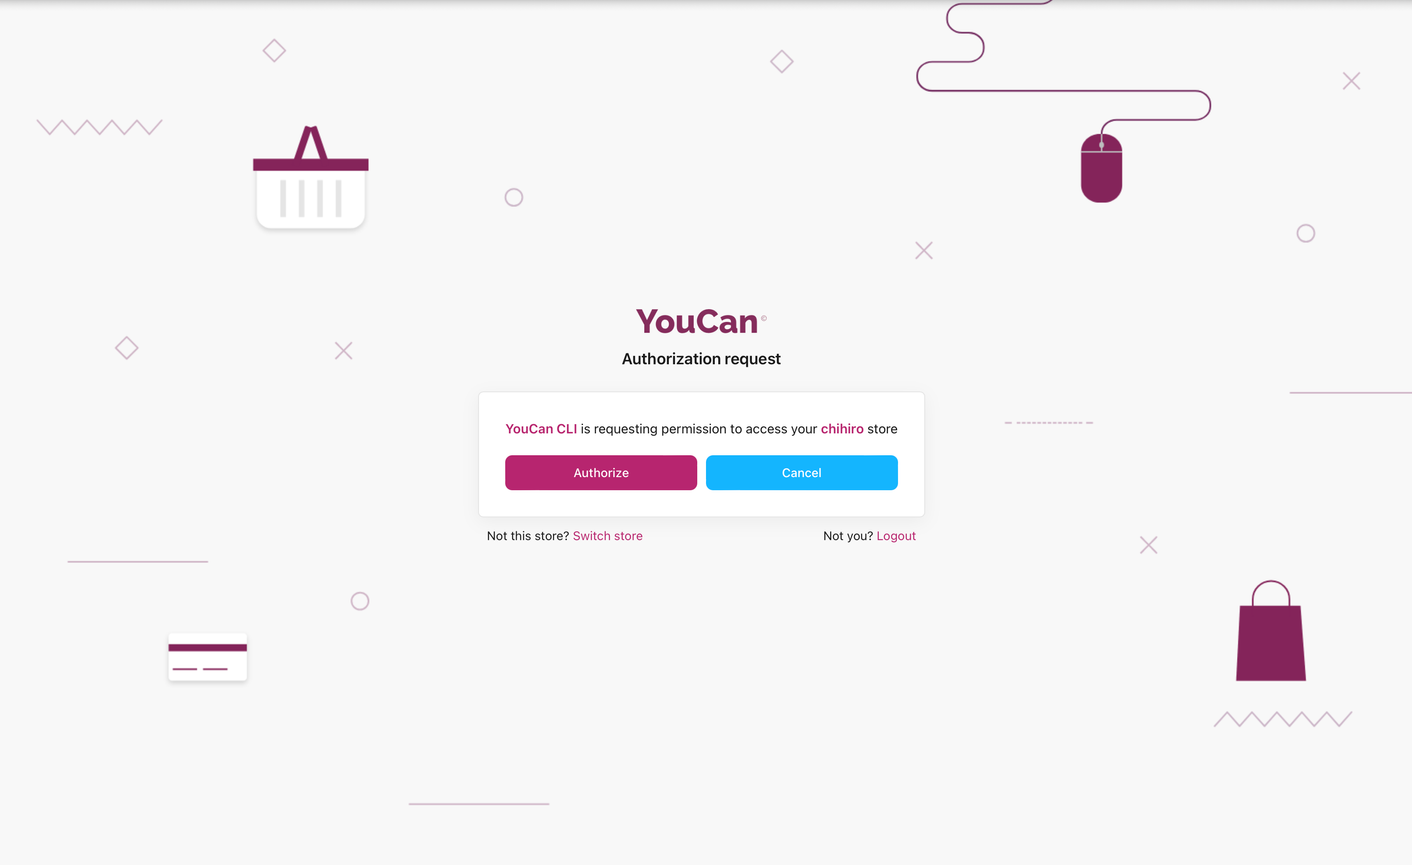
Run the following command to authorize the CLI to access your YouCan Store.
youcan auth loginA new page will appear for authorization. Simply click the 'Authorize' button to grant access.
Start Building Your Theme App Extension
Step 1: Application Set Up
To initialize a new app, run the following command
npm init @youcan/app@latestYou'll be prompt for the project name, for our case we will name it product-info.
After that, the command will ask you about the type of application you want to create:
- Select “start with an extension only”
Step 2. Create A New Theme App Extension
You'll use YouCan CLI to generate a new extension.
- Navigate to the directory of the app that you want to add your extension to.
cd product-info- Run the following command to start creating the extension:
youcan app generate extension- Select
Theme extensionas the extension type. - Provide a name for your extension.
After this, you’ll have an extension directory created in your project with a basic folder structure that we'll delve into.
WARNING
When you generate the extension folder using YouCan CLI, it's best to have one theme extension per app directory, as each extension represents a distinct feature or functionality. Mixing multiple extensions of the same type within the same directory can lead to confusion, and potential conflicts, making it harder to manage and maintain your codebase.
Theme App Structure
As a starting point, the generated extension directory includes a working example of a theme app extension that displays product ratings. Let's explain what each file/folder does:
Explore the theme architecture to get a better understanding of themes layout.
// youcan.app.json

{
    "name": "product-info",
    "id": "dapp_2azPpuZ2RiuhxzqDTChqbMfRf0V",
    "app_url": null,
    "redirect_urls": [],
    "oauth": {
        "scopes": [
            "*"
        ],
        "client_id": "38"
    }
}// extensions/product-info/youcan.extension.json
{
"name": "rating",
"type": "theme"
}Understanding app blocks
To understand theme app extensions, you first need to understand what blocks are in themes and how sellers interact with them.
Blocks are modules of content that can be added, removed, reordered and configured by sellers in the theme editor, allowing them to take control over the look and feel of every aspect of their online store.
For instance, the app block that you’ll find within the “blocks” folder shows how to create a theme app extension that renders a dynamic star rating for a product using the average rating from a metafield. Sellers can customize the star color through settings. If the avg_rating is 4 or higher, a thumbs-up icon and a recommendation message are displayed.
{% assign avg_rating = block.settings.product.metafields.demo.avg_rating.value | round %}
<span style="color:{{ block.settings.colour.hex }}">
  {% render 'stars', rating: avg_rating %}
</span>

{% if avg_rating >= 4 %}
  <br>
  <img src="{{ "thumbs-up.png" | asset_img_url: '15x' }}" height="15" width="15" loading="lazy">
  {{ 'ratings.home.recommendationText' | t }}
{% endif %}

{% schema %}
{
  "label": "Star Rating",
  "target": "section",
  "settings": [
    {
      "type": "product",
      "id": "product",
      "label": "product",
      "autofill": true
    },
    {
      "type": "color",
      "id": "colour",
      "label": "Star Color",
      "default": "#ff0000"
    }
  ]
}
{% endschema %}INFO
You can have multiple app blocks within a single app extension.
Block targets
Every block declares a target in its schema. The target controls where and how the block is rendered:
| Target | Description |
|---|---|
section | Placed inside a theme section by the seller via the theme editor. |
body | Injected globally at the end of <body> on every page. Ideal for widgets like live chat, cookie banners, or popups. |
head | Injected globally inside <head> on every page. Useful for third-party scripts or meta tags. |
body and head blocks are called embed blocks. They render automatically on every page once the seller enables the extension — no manual placement in the theme editor is required.
WARNING
Embed blocks require the theme layout to include (for body) and (for head). See Layout overview for details.
Embed block example
An embed block uses "target": "body" and renders globally on every storefront page. Here is a minimal live chat widget:
{% assign yc_color = block.settings.primary_color.hex %}

<div id="my-chat-widget" style="position:fixed;right:24px;bottom:24px;--brand:{{ yc_color }};">
  <!-- widget markup -->
</div>

{% schema %}
{
  "label": "Live Chat Widget",
  "target": "body",
  "settings": [
    {
      "type": "color",
      "id": "primary_color",
      "label": "Brand Color",
      "default": "#6c3aff"
    }
  ]
}
{% endschema %}Loading assets from app blocks
Your extension's assets/ folder is served via CDN. Inside any block template you can reference those files using the same Liquid filters available to themes:
{{ 'widget.css' | asset_url | stylesheet_tag }}
{{ 'widget.js' | asset_url | script_tag }}You can also declare assets in the schema using the javascript and stylesheet fields. The platform injects them automatically — the stylesheet is added to <head> and the script is deferred:
{
  "label": "Live Chat Widget",
  "target": "body",
  "javascript": "widget.js",
  "stylesheet": "widget.css",
  "settings": []
}Both approaches can be combined: use the schema fields for your primary bundle and inline filters for additional assets (e.g. a secondary stylesheet).
Step 3: Syncing Changes to Dev Store
To preview the changes you made after creating your theme app extension, start a local development server. Running the dev command will build your app and bundle your app extensions.
- Head to your App directory
- Execute the following command:
youcan app devNext, we should install the application on our store so it can be used for our theme.
Step 4: Preview your theme app extension
For theme app extension preview, run the following command that will host your theme app extension on your currently installed theme; make sure you are in the correct directory:
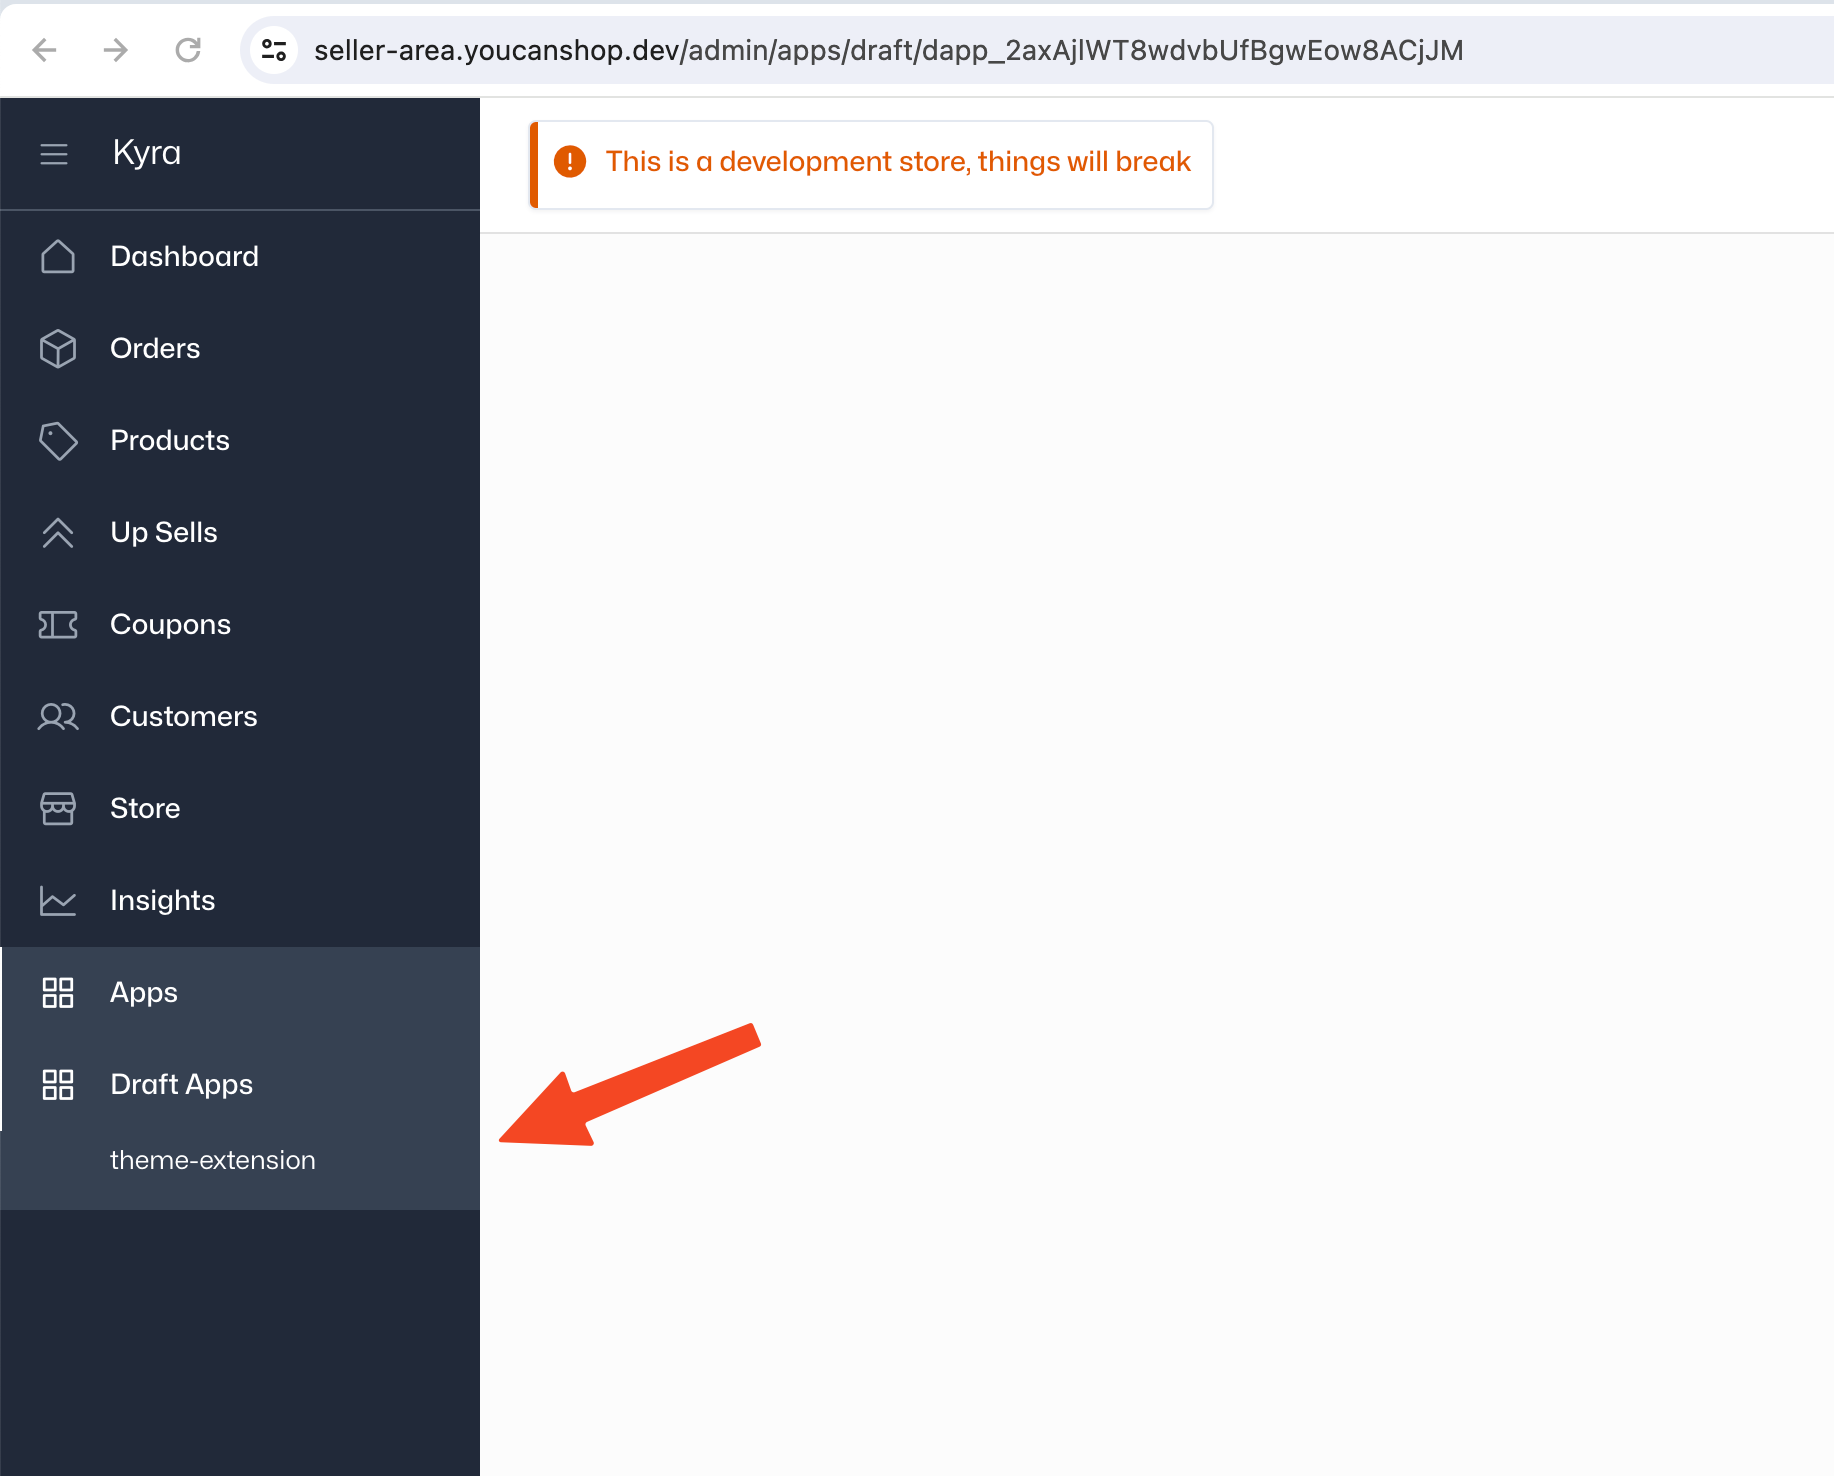
youcan app installThis will redirect you to a page to enable development store preview. Click on "Authorize" to grant access.
Once you have done that, you will find the app in your Apps page within the seller area.
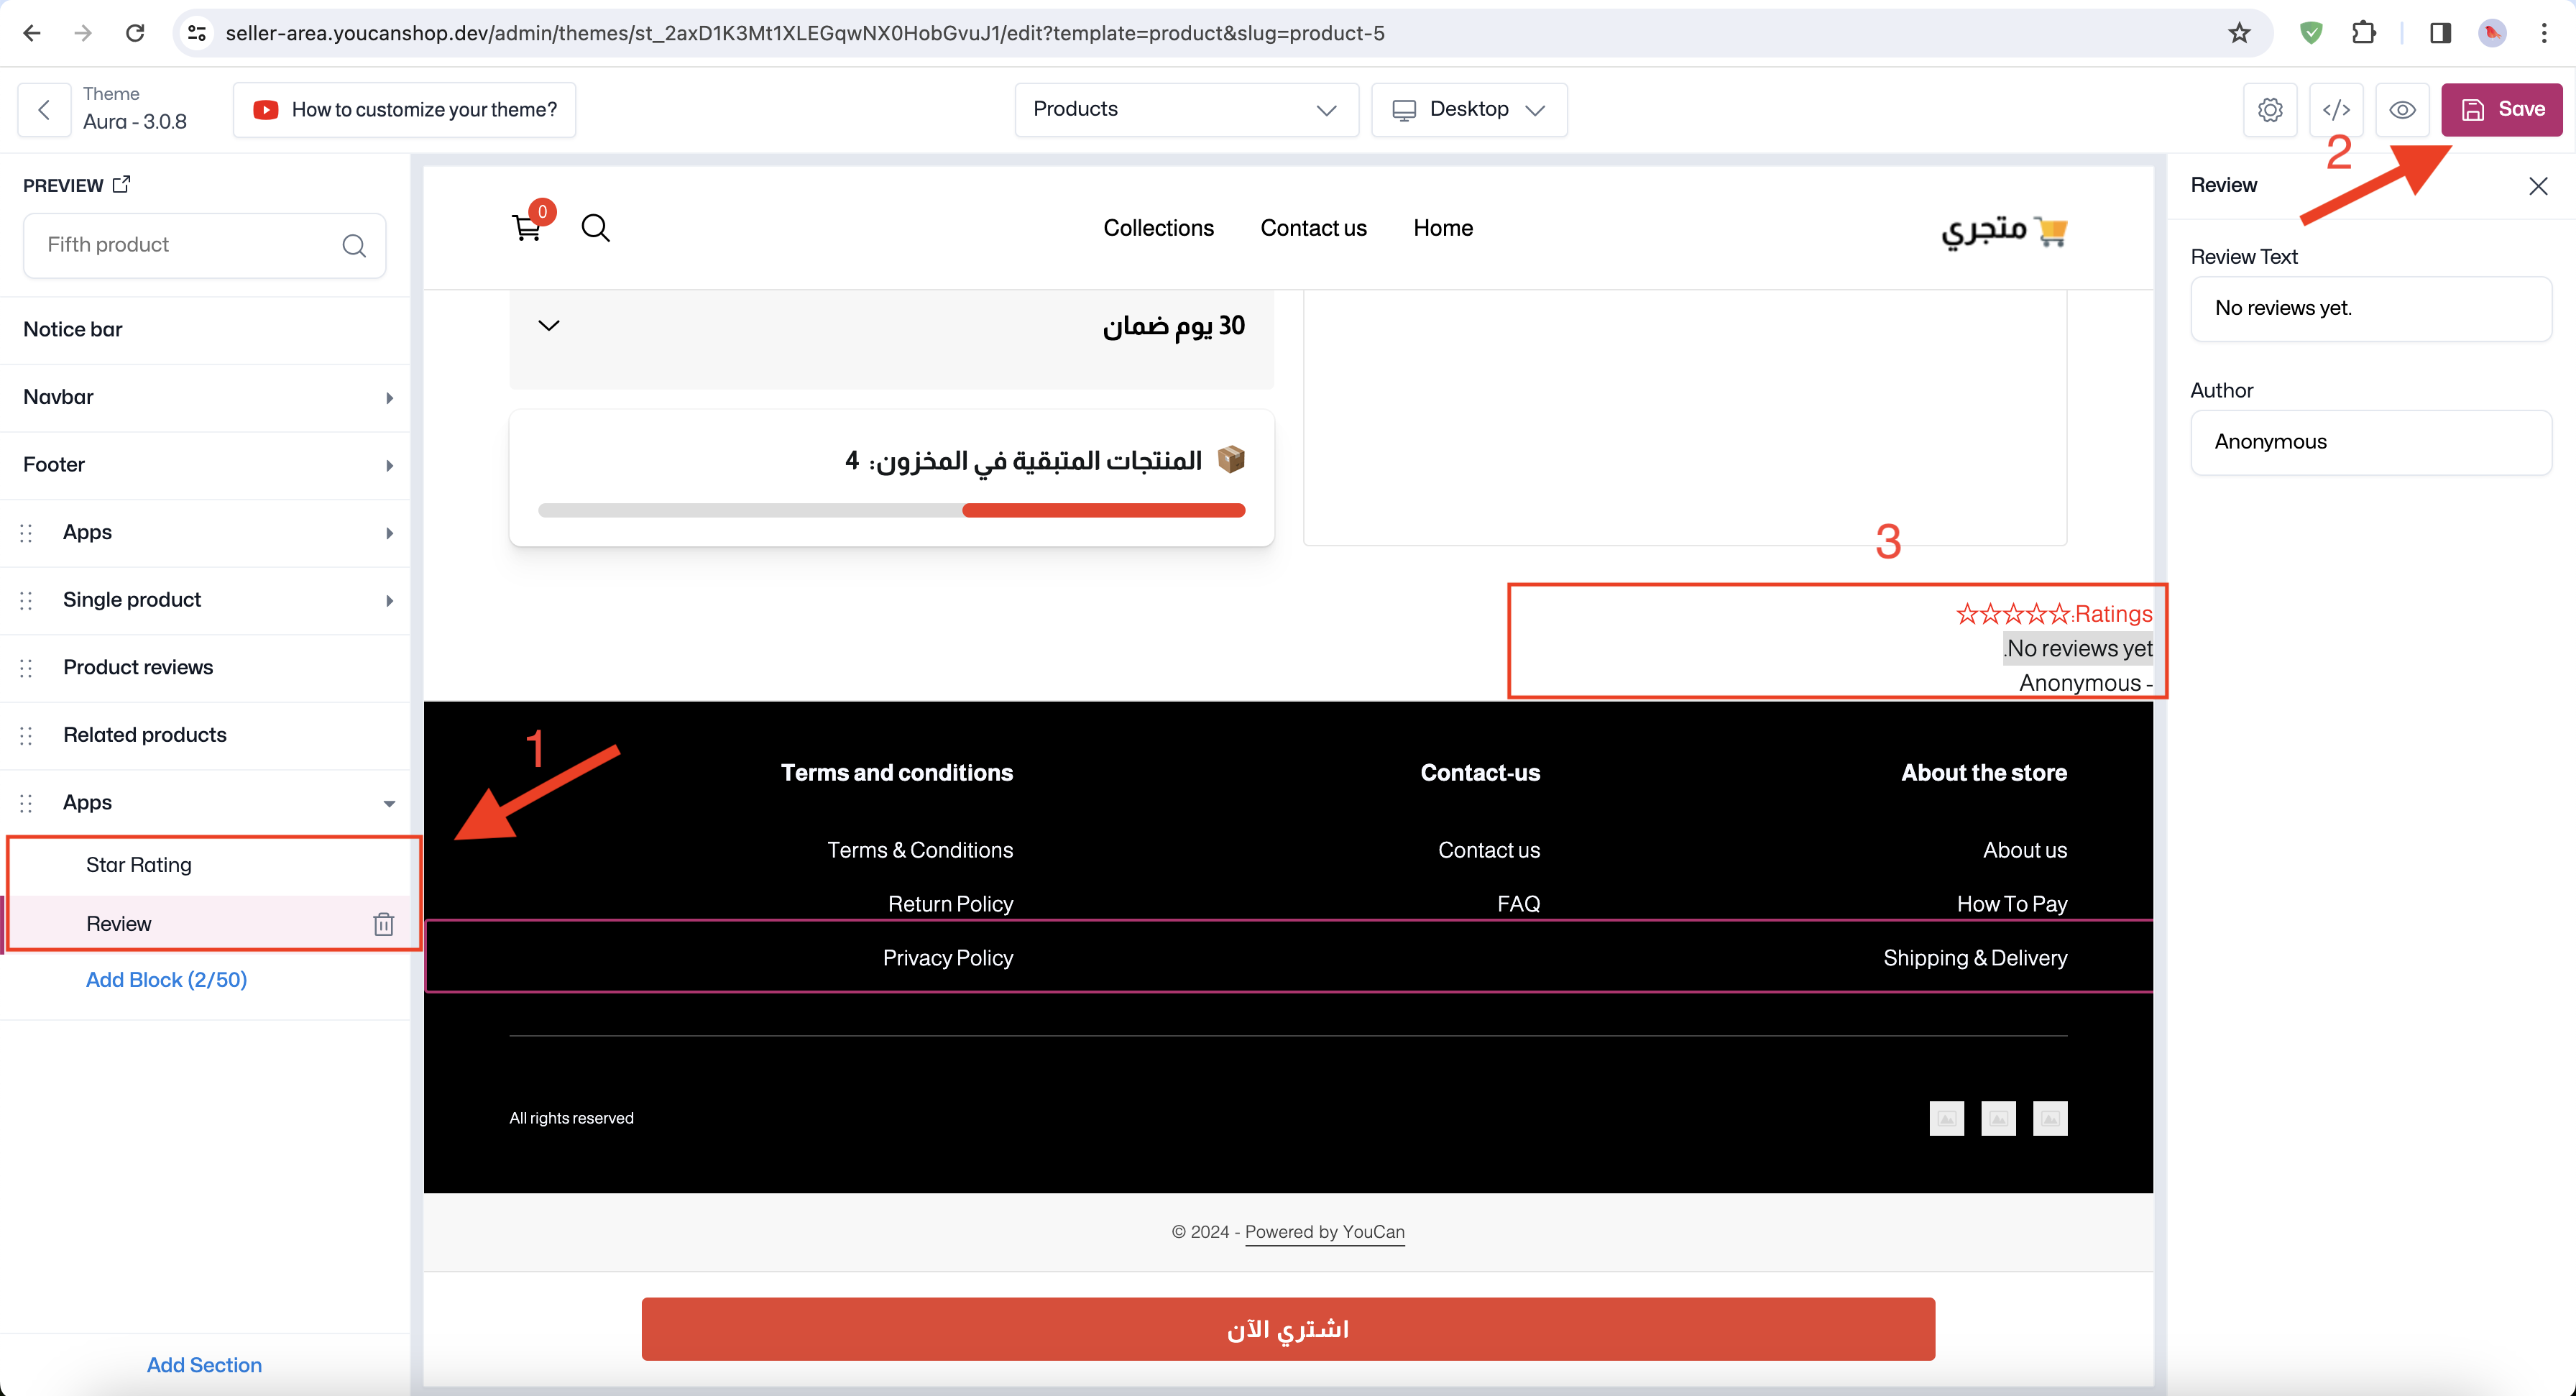
Step 5: Add theme extension blocks
To integrate the app into your theme, go to Themes in the seller area, and click on the "customize" button of the currently installed theme.
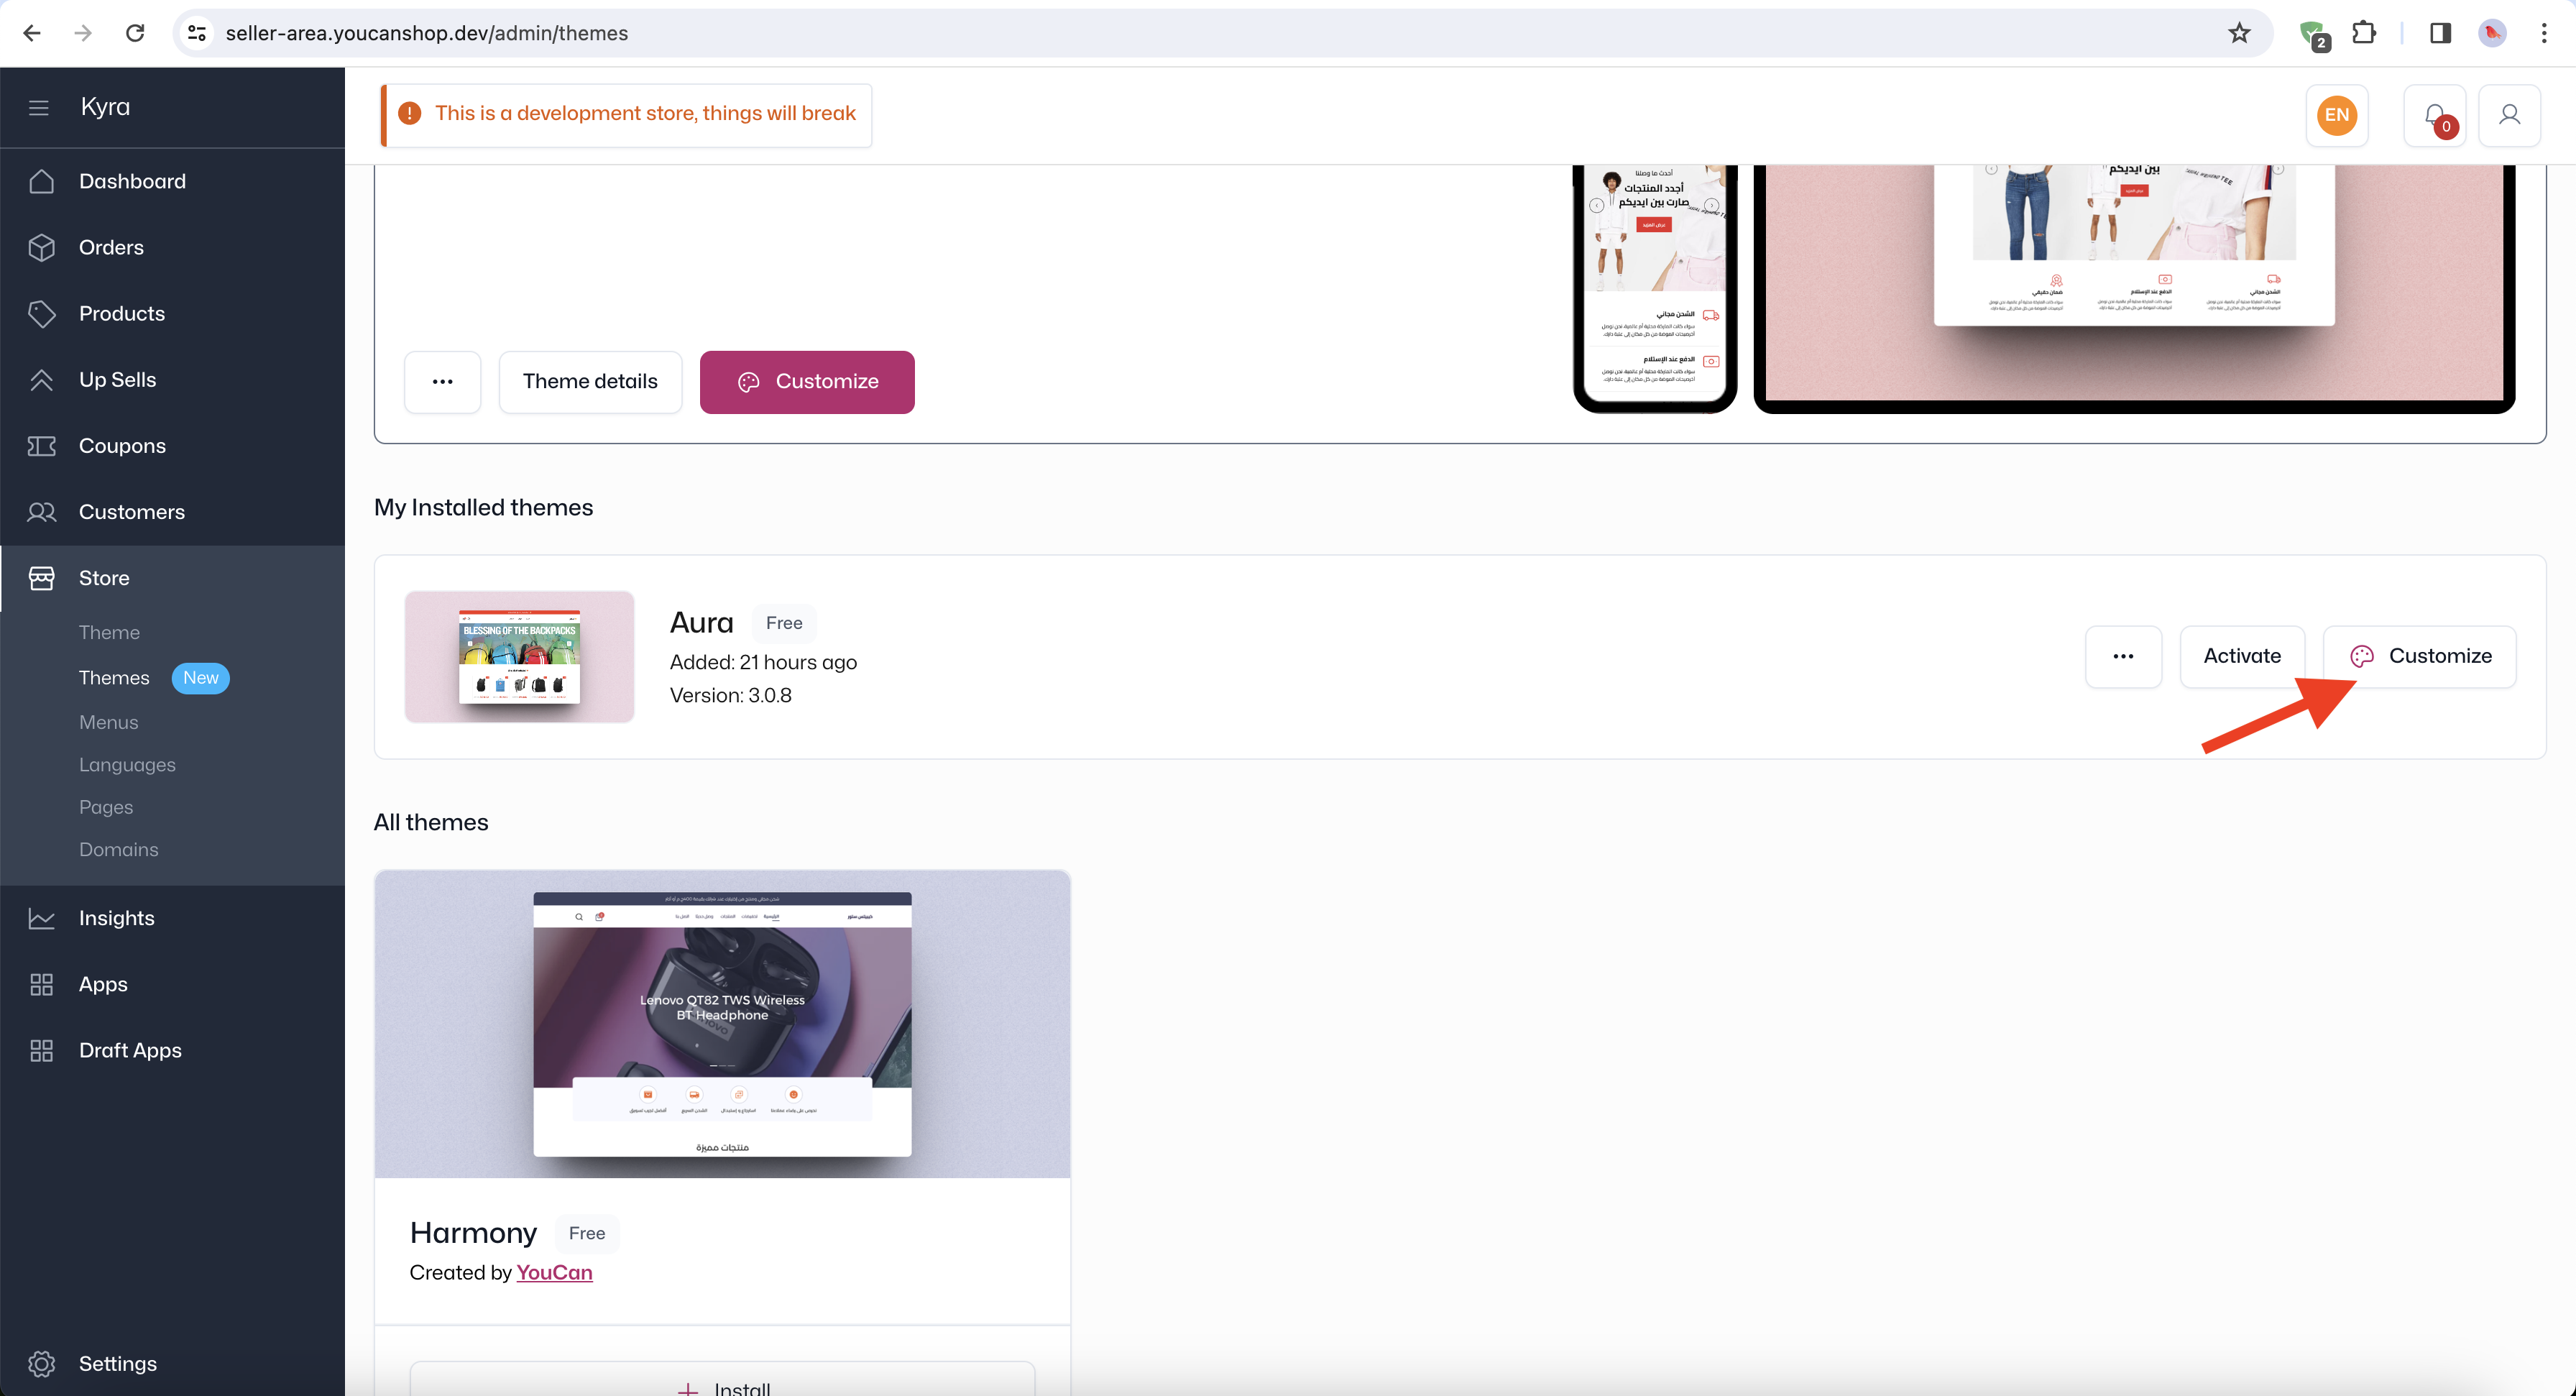
This will redirect you to the theme editor, that's where you define what your block will render once you've added the app section.
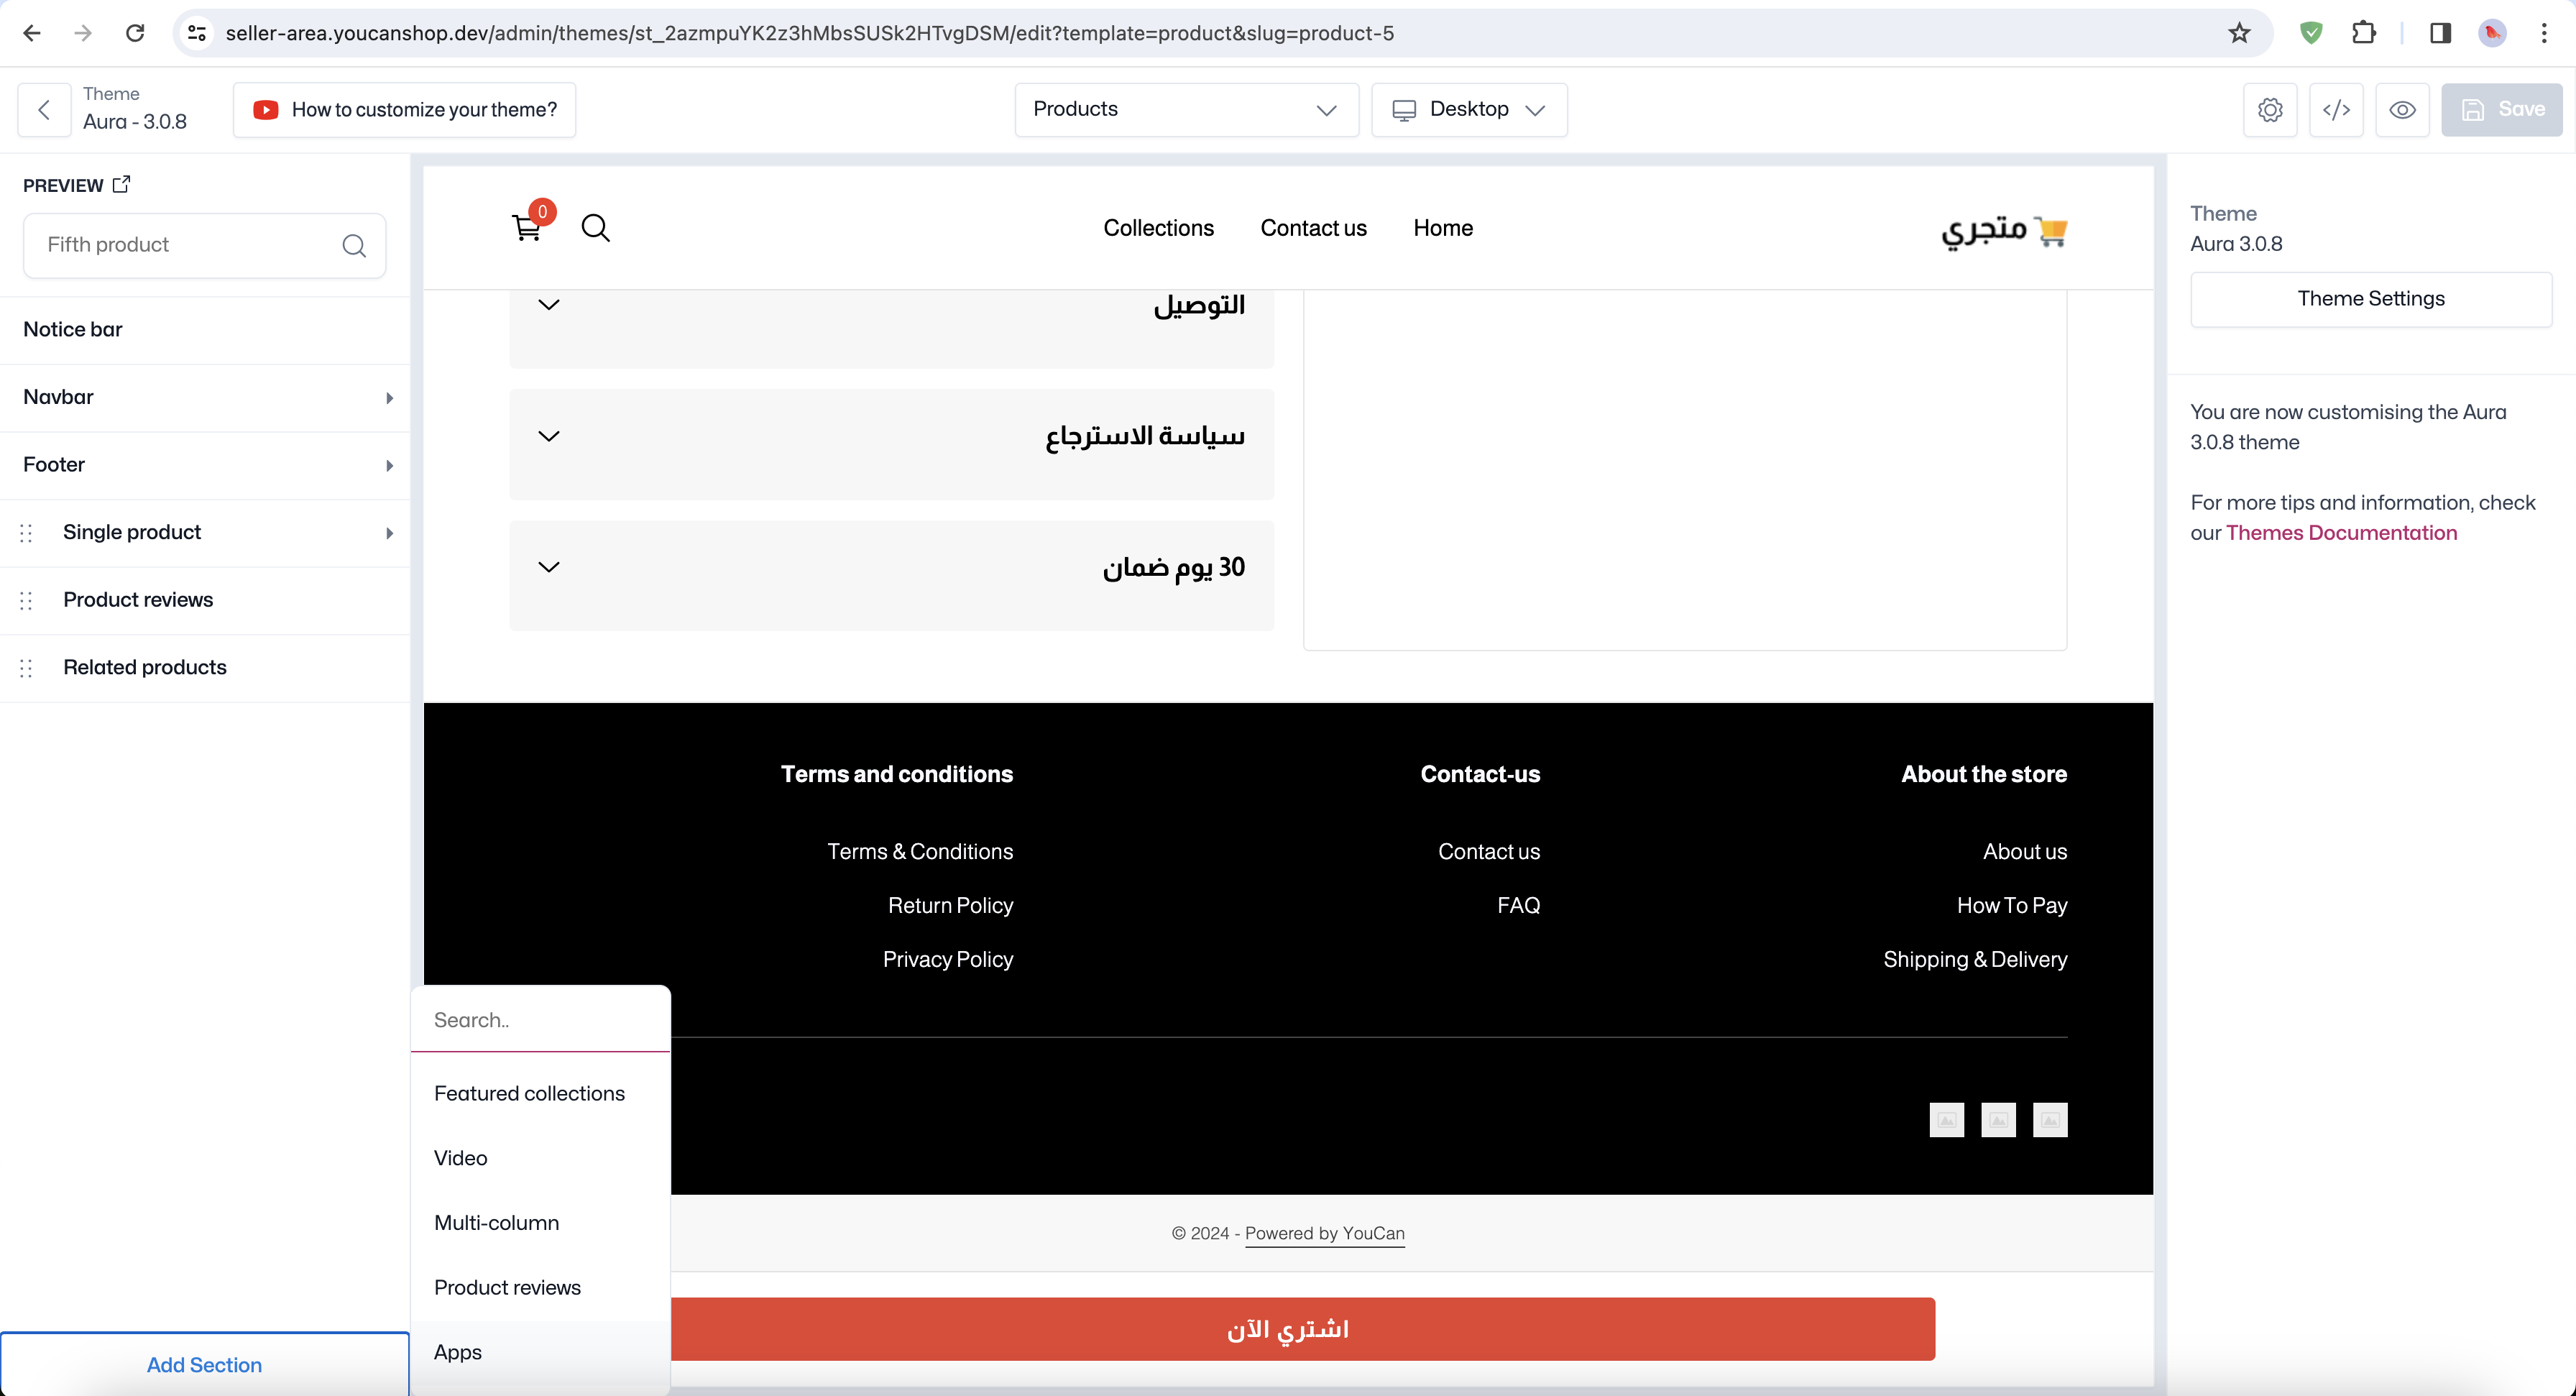
From the Apps section, on the left navigation bar, add the specific blocks you want to display. Save theme and exit the editor.

Publish your app
To publish your Theme App Extension, head to the YouCan partner dashboard, and submit your app for review.
- Navigate to the "Apps" section and locate your app extension.
- Click on "Push For Review".
- Wait for the YouCan team to review and approve your app.
- Once approved, it will be published on the YouCan platform, available for any YouCan seller to integrate on their theme.
Important
Please note that after submitting your app for review, the app is locked for changes. It's important to finalize all modifications before submission.
Conclusion
Congratulations! You have successfully navigated through the process of creating a Theme App Extension for the YouCan platform. By following this comprehensive guide, you've gained the knowledge and skills necessary to build, integrate, and publish your theme extension.